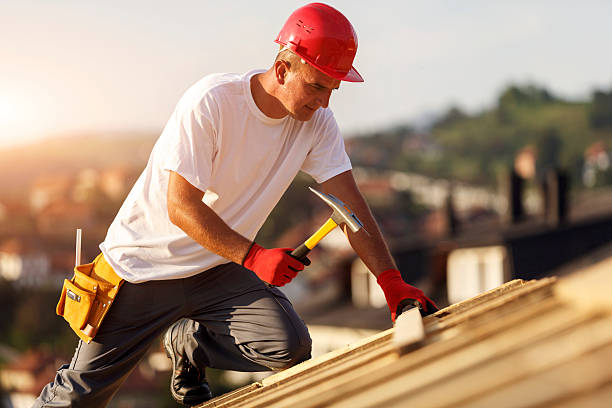
Proper installation of roof shingles is essential for ensuring the durability and effectiveness of your roof. This step-by-step guide outlines the process in detail, helping you or your contractor achieve a professional-grade installation.
Tools and Materials Needed
- Roofing nail gun or hammer
- Roofing knife
- Chalk line
- Measuring tape
- Ladder or scaffolding
- Pry bar (for removing old shingles)
- Asphalt shingles or other selected roofing material
- Underlayment (e.g., felt paper or synthetic membrane)
- Drip edge
- Roofing nails
- Starter strip shingles
Step-by-Step Installation Process
- Prepare the Roof Surface Start by ensuring the roof deck is clean and free of debris. Remove old shingles if performing a replacement. Inspect for signs of rot or damage on the decking, and make necessary repairs.
- Install Drip Edge Apply drip edge along the eaves to prevent water from seeping under the roofing system. Use roofing nails to secure it every few inches, ensuring it lies flush with the roof edge.
- Lay Down Underlayment Roll out your chosen underlayment across the roof deck, starting at the bottom edge and working upward toward the ridge. Overlap each row by at least two inches to ensure proper coverage, securing it with staples or nails.
- Install Starter Strip Shingles Place starter strip shingles along the eaves to provide an initial barrier against wind-driven rain. These should overhang slightly beyond the drip edge for optimal performance.
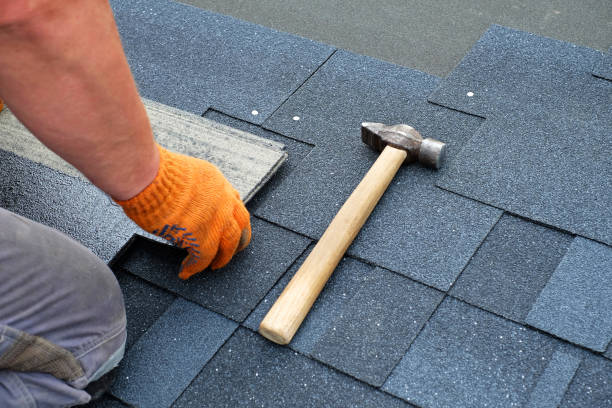
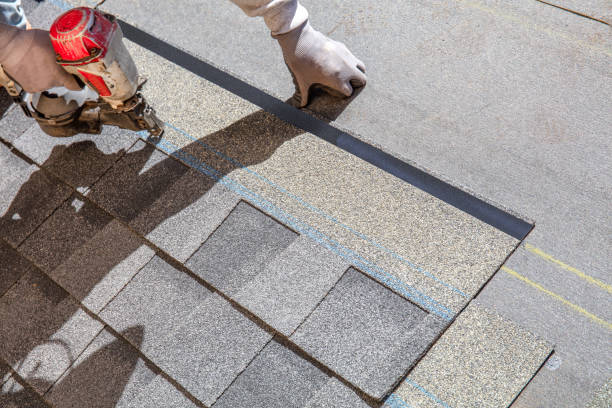
- Begin Laying Shingles Start with a full shingle at one corner of your roof and work across horizontally:
- Align each shingle with your chalk line for straight rows.
- Leave a slight gap between adjacent shingles to accommodate expansion due to temperature changes.
- Secure each shingle using four roofing nails placed just below its adhesive strip.
- Stagger Shingle Rows For proper overlap, cut a portion off one end of every second row’s first shingle to stagger seams. This step improves water resistance by preventing aligned seams where water might seep through.
- Trim Around Roof Features Carefully cut shingles using a roofing knife around chimneys, vents, skylights, and other obstructions using metal flashing as reinforcement in these areas to prevent leaks.
- Cap Off With Ridge Shingles Install ridge cap shingles along ridges and hips for added protection against wind while providing an attractive finish to your roof.
Key Tips for Success
- Always follow manufacturer instructions specific to your chosen material.
- Work during dry weather conditions to avoid slipping hazards on wet surfaces.
- Use safety harnesses when working on steep roofs.
| Feature | Recommended Practice |
| Nail Placement | Use four nails per shingle; six if in high-wind areas |
| Overlap Measurement | Maintain at least two inches of overlap |
| Ventilation Considerations | Ensure proper attic ventilation for longevity |
By following these steps carefully, you can ensure a durable and appealing shingle installation that protects your home effectively over time while maintaining aesthetic appeal.
How to Tell When You Need a Full Roof Replacement from a Minneapolis Roofer
A roof is a critical component of any home, providing protection from the elements while enhancing energy efficiency and overall structural integrity. However, every roof has a finite lifespan, and recognizing the signs that indicate the need for a full replacement is essential to avoid costly repairs or potential damage to your home. Below, we break down key indicators that suggest it’s time for a new roof and provide actionable steps for homeowners.
Essential Tips for Minneapolis MN Roof Repair and Replacement Needs
- Asphalt shingles: 20-25 years
- Wood shakes: 20-30 years
- Metal roofs: 40-70 years
- Clay tiles: 50+ years
If your roof is nearing or has exceeded its expected lifespan, it’s time to start planning for a replacement. - Visible Damage to Shingles
Look for: - Cracked, curled, or missing shingles
- Granule loss on asphalt shingles (check gutters and downspouts)
- Bald spots or uneven wear patterns
- Water Damage or Leaks
Water stains on ceilings or walls may indicate leaking caused by deteriorated roofing materials. Addressing this issue promptly can prevent extensive structural damage. - Sagging Roof Deck
A sagging appearance often signals underlying structural issues with the decking or supports, which likely requires an immediate replacement. - Moss and Algae Growth
While moss and algae are not always harmful initially, over time they can retain moisture that accelerates shingle deterioration. - High Energy Bills
An old or damaged roof may lead to poor insulation, causing heating and cooling systems to work harder than necessary.
Benefits of Timely Minneapolis MN Roof Installation
- Improved Safety: A new roof eliminates safety hazards such as leaks and structural instability.
- Enhanced Energy Efficiency: Modern roofing materials often include energy-efficient options.
- Increased Home Value: An updated roof can boost curb appeal and resale value.
- Prevention of Costly Repairs: Investing in replacement proactively helps avoid extensive repair costs caused by neglecting damages.
When Repairs Are No Longer Enough
While minor issues like replacing a few shingles or sealing small leaks may delay larger repairs temporarily, there comes a point when constant fixes become more expensive than replacing the entire roof. Keep track of repair costs annually—if they amount to more than 50% of what you’d spend on new installation, it’s likely more cost-effective to opt for replacement instead.
Budgeting for Your New Roof
| Roofing Material | Average Lifespan | Estimated Cost per Square Foot* |
| Asphalt Shingles | 20–25 years | $3–$6 |
| Metal Roofing | 40–70 years | $5–$14 |
| Clay/Concrete Tiles | 50+ years | $10–$18 |
| Wood Shakes/Shingles | 20–30 years | $6–$12 |
*Costs vary based on location and installation complexity.
Additionally: – Obtain multiple quotes from licensed contractors. – Factor in labor costs and permit fees. – Consider financing options if upfront payment isn’t feasible.
Recognizing when it’s time for a full roof replacement—and acting accordingly—can save you significant stress, expense, and potential damage in the long run. By staying vigilant about warning signs such as aging materials, water damage, and rising energy bills, you’ll be better prepared to make timely decisions about maintaining one of your home’s most important components.
Understanding the Costs Involved in Roof Replacements and How to Budget
When considering a roof replacement, understanding the associated costs is crucial for proper planning and budgeting. Roof replacement is a significant investment that can vary depending on several factors, including materials, labor, roof size, and geographic location. Let’s break down the key cost components and budgeting tips to ensure you’re financially prepared.
Factors Affecting Roof Replacement Costs
- Roof Size and Pitch: Larger roofs require more materials and labor. Steeper roofs may also involve higher costs due to increased complexity.
- Material Choice: Different roofing materials come with varying price points per square foot:
- Asphalt shingles: $3–$5 per square foot
- Metal roofing: $5–$12 per square foot
- Clay tiles: $10–$18 per square foot
- Wood shakes: $6–$10 per square foot
- Labor Costs: Labor makes up a substantial portion of roof replacement expenses. Complex designs or removing old roofing materials can drive up costs.
- Location: Regional pricing differences, local contractor fees, and permitting requirements can influence your final bill.
- Additional Features: Skylights, chimneys, or custom ventilation may necessitate additional structural adjustments or specialized work.
Average Cost Ranges for Roof Replacement
| Home Size (Square Feet) | Estimated Range (Asphalt) | Estimated Range (Metal) |
| 1,000 sq. ft. | $3,000–$5,000 | $5,000–$12,000 |
| 1,500 sq. ft. | $4,500–$7,500 | $7,500–$18,000 |
| 2,500 sq. ft. | $7,500–$12,500 | $12,500–$30,000 |
Tips for Budgeting Your Roof Replacement
Effective budgeting involves anticipating both expected and unforeseen expenses while exploring ways to reduce costs where possible.
- Get Multiple Quotes
Reach out to at least three reputable contractors for estimates. Compare pricing details such as material breakdowns and labor charges. - Inspect Your Roofing Structure First
Have a professional assess your roof’s condition before repairs begin. Identifying issues like rotting wood or damaged underlayment early can prevent surprise costs. - Plan for Contingencies
Set aside an extra 10%–15% of your budget in case unexpected repairs arise during construction. - Consider Financing Options
If upfront costs are challenging to manage: - Look into payment plans offered by contractors.
- Explore home improvement loans or refinancing options.
- Choose Cost-Effective Materials Wisely
While high-end materials last longer and add value to your home over time: - Asphalt shingles offer durability at an affordable price point.
- Metal roofs provide longevity but may require higher initial investment.
- Leverage Insurance Coverage Where Possible
If damage is due to storms or other covered events: - Contact your insurance provider.
- File claims promptly with detailed documentation of damages.
Long-Term Savings Considerations
While upfront costs are important to manage effectively during budgeting discussions, it’s equally vital to evaluate long-term benefits such as energy efficiency and durability when selecting materials or contractors for your roof replacement project.
By carefully examining every cost factor involved in replacing a roof while implementing smart financial strategies ahead of time—homeowners will find themselves better equipped both now financially long term
Filing an Insurance Claim for Roof Damage with a Minneapolis MN Roofing Contractor
Filing an insurance claim for roof damage can seem like a daunting task, especially if you’re unfamiliar with the process. However, understanding the necessary steps and being prepared can make the experience smoother and increase your chances of receiving the compensation you deserve. Here’s a detailed guide to help you navigate this process effectively.
Steps to Filing an Insurance Claim for Roof Damage
- Conduct a preliminary inspection to identify visible roof damage.
- Look for missing shingles, leaks, cracks, or other signs of wear and tear.
- Document all damages by taking clear photos and videos from multiple angles.
- Familiarize yourself with your homeowner’s insurance policy.
- Understand what types of roof damage are covered (e.g., storm damage, hail, wind) and any exclusions.
- Check whether your policy includes replacement cost coverage or actual cash value (ACV).
- Notify your insurance company about the potential claim as soon as possible.
- Provide them with basic details about the damage (e.g., date of occurrence and weather event if applicable).
- Confirm deadlines for filing claims set by your insurer.
- Schedule an inspection with a licensed roofing contractor for a more detailed evaluation.
- Request a written estimate detailing required repairs or replacement costs.
- Some contractors may even assist in communicating directly with your insurance adjuster.
- Submit all required documentation to initiate the claims process, including:
- Photos/videos of damage
- Written estimate from your contractor
- Relevant receipts or invoices
- Any additional evidence like weather reports if applicable
- Keep copies of all submitted materials for your records.
- The insurance company will assign an adjuster to inspect the roof damage in person.
- Be present during this visit along with your contractor (if possible) to ensure accurate assessment and documentation.
- After reviewing your claim, the insurer will provide a settlement offer based on their findings and policy terms.
- If there are discrepancies in their offer compared to repair estimates, you may need to negotiate or submit additional evidence.
- Once approved, hire a professional roofer to complete the necessary repairs or replacement work outlined in the claim.
Common Mistakes to Avoid During Roof Damage Claims
- Failing to document evidence thoroughly before starting repairs.
- Missing deadlines set by your insurer for filing claims or submitting information.
- Accepting settlement offers without carefully reviewing them against repair estimates.
Table: Key Differences Between Replacement Cost Coverage & Actual Cash Value
| Factor | Replacement Cost Coverage | Actual Cash Value (ACV) |
| Payout Amount | Covers full cost of repairing/replacing without depreciation deductions | Deducts depreciation based on age/wear |
| Upfront Costs | May cover upfront costs entirely | Requires homeowners to bear some upfront costs |
| Best For | Newer roofs | Older roofs |
What You Need To Expect After Filing
Once you’ve filed a claim: – Timelines can vary depending on factors like insurer processes or weather-related disasters affecting many homes simultaneously. – You may need patience as adjusters evaluate multiple claims during busy periods following storms or natural disasters. – Expect clear communication from insurers regarding next steps; don’t hesitate asking questions if anything seems unclear at any stage.
By following these guidelines thoroughly while remaining organized throughout interactions between insurers + contractors ensures smooth experience protecting long-term investment rooftop provides home
Comparing Different Roofing Materials: Asphalt, Clay, Metal, and Wood Options
Selecting the right roofing material is a critical decision for homeowners and contractors alike. The material you choose not only impacts the aesthetic appeal of the property but also its durability, energy efficiency, and maintenance requirements. Below, we’ll explore four popular roofing materials — asphalt, clay, metal, and wood — to help you make an informed choice.
Asphalt Shingles
Overview:
Asphalt shingles are one of the most commonly used roofing materials in residential construction due to their affordability and ease of installation.
Advantages:
– Cost-effective option suitable for most budgets.
– Available in a wide range of colors and styles.
– Relatively easy to install compared to other materials.
– Offers decent durability with lifespans typically ranging from 20-30 years.
Disadvantages:
– Susceptible to damage in extreme weather conditions (e.g., hail or high winds).
– Less environmentally friendly as it is petroleum-based.
Best Suited For: Homeowners seeking an affordable yet reliable roofing material for traditional-style homes.
Clay Tiles
Overview:
Clay tiles are favored for their timeless appearance and excellent durability. They’ve been used for centuries and remain a popular option in regions with warmer climates.
Advantages:
– Extremely long-lasting with lifespans exceeding 50 years when properly maintained.
– Provides excellent resistance to fire, rot, and insects.
– Offers natural ventilation by allowing air circulation beneath the tiles.
Disadvantages:
– Heavier than other options; may require reinforced roof structures.
– More expensive upfront compared to asphalt shingles.
Best Suited For: Homes with Mediterranean or Spanish architectural designs or properties in areas experiencing hot weather.
Metal Roofing
Overview:
Metal roofs have gained popularity as an energy-efficient and durable roofing solution with a modern appeal.
Advantages:
– Extremely durable; can last 40–70 years depending on the type of metal used (e.g., steel, aluminum).
– Reflects sunlight effectively, reducing cooling costs during summer months.
– Lightweight yet strong enough to withstand harsh weather conditions like snow or high winds.
Disadvantages:
– Higher initial costs compared to asphalt shingles.
– Can be noisy during heavy rain unless accompanied by proper insulation systems.
Best Suited For: Modern-style homes or properties in regions prone to frequent storms or heavy snowfall.
Wood Shingles/Shakes
Overview:
Wood shingles or shakes deliver a rustic charm that suits both traditional and contemporary architectural styles.
Advantages:
– Eco-friendly when sourced sustainably since wood is biodegradable.
– Provides natural insulation which helps regulate indoor temperatures.
– Unique appearance that weathers beautifully over time (turning silvery-gray).
Disadvantages:
– Requires more maintenance due to vulnerability against moisture, mold, and pests if untreated.
– Shorter lifespan (20–30 years) relative to clay or metal roofs unless treated regularly with preservatives.
Best Suited For: Homes with rustic aesthetics or those located in drier climates where wooden material works best without excessive moisture exposure.
Comparison Table
| Material | Lifespan | Cost | Maintenance | Weather Resilience | Ideal Style | Environmental Impact |
| Asphalt | 20–30 years | Low | Low | Moderate | Traditional | Moderate |
| Clay | 50+ years | High | Low | Excellent (fire-resistant) | Mediterranean/Spanish | High |
| Metal | 40–70 years | High | Low | Excellent | Modern | High (recyclable) |
| Wood | 20–30 years | Moderate/High? | Medium/High ? Adequate Styles Rustic Traditional? Lower |
Expert Minneapolis MN Roofing Contractor Offering Innovative Solutions
The roofing industry has witnessed significant advancements in recent years, driven by technology, sustainability, and efficiency. Contractors and homeowners alike are benefiting from innovative solutions that not only improve functionality but also contribute to environmental conservation. Below are some of the most impactful trends and innovations reshaping the roofing industry today.
1. Solar Roofing Systems
Solar roofs are no longer just bulky panels installed over traditional roofing materials. Modern solar shingles seamlessly integrate into roof designs, providing both energy production and aesthetic appeal. Key benefits include:
– Energy Efficiency: Generate renewable energy to reduce utility bills.
– Aesthetic Design: Blend into the roof for a sleek appearance.
– Durability: Often comparable in lifespan to traditional shingles.
Companies like Tesla have developed solar roof tiles that mimic the look of standard asphalt or slate shingles while offering all the advantages of solar power.
| Feature | Traditional Solar Panels | Solar Shingles |
| Aesthetics | Bulky | Sleek and discreet |
| Energy Production | High | Moderate |
| Installation Cost | Lower | Higher |
2. Cool Roof Technology
Cool roofs are designed to reflect more sunlight and absorb less heat, making buildings more energy-efficient, particularly in hot climates. These roofs use specialized coatings or reflective materials like white membranes to achieve their effect.
Benefits of Cool Roofs:
- Reduced energy consumption for cooling systems.
- Prolonged roof lifespan due to reduced thermal stress.
- Enhanced indoor comfort during peak summer months.
Cool roof coatings can be applied to various materials like asphalt shingles, metal sheets, or tiles for maximum flexibility.
3. Green Roofing Systems
Green (or living) roofs incorporate vegetation layers over waterproof membranes, bringing nature directly onto rooftops in urban areas.
Advantages of Green Roofs:
- Improved insulation properties.
- Mitigation of urban heat island effects.
- Enhanced air quality through carbon absorption.
- Stormwater runoff management by absorbing precipitation.
Urban environments are increasingly adopting green roofs on commercial properties for their eco-friendly benefits and ability to meet local sustainability regulations.
4. Advanced Synthetic Materials
- Resistant to impact, fire, and extreme temperatures.
- Lightweight for easier installation.
- Lower maintenance requirements compared to natural alternatives.
Homeowners looking for longevity often opt for synthetic roofing as it offers a balance between cost-effectiveness and performance.
5. Smart Roofing Technology
Smart roofing integrates IoT (Internet of Things) sensors with traditional systems to monitor a roof’s condition in real time. Sensors can detect leaks, measure moisture levels, or track temperature changes within the structure.
Features of Smart Roofs:
- Early detection of problems reduces repair costs.
- Data accessibility via mobile apps or cloud platforms.
- Integration with other smart home systems for seamless operation.
This technology is particularly beneficial for commercial properties where maintenance schedules require detailed monitoring due to expansive surface areas.
6. Recycled Roofing Materials
Sustainable practices are gaining traction across industries, including roofing. Materials such as recycled rubber tires or post-consumer plastics are being repurposed into durable shingles or panels that rival traditional products in strength and appearance while diverting waste from landfills.
Why Choose Recycled Materials?
- Environmentally friendly choice aligned with green building standards.
- Comparable durability at a competitive price point.
- Availability in various textures and colors suitable for different architectural styles.
The integration of these innovative solutions reflects a broader shift toward sustainability and technological advancement within the roofing sector. By staying informed about these trends, homeowners can make smarter decisions about their investments while contributing positively to environmental goals.
Essential Safety Measures Every Roofer Should Follow Before Starting a Project
Roofing is an inherently risky job that requires careful planning and adherence to safety protocols. Whether you are a professional roofer or taking on a DIY project, ensuring your safety and the safety of others is paramount. This guide outlines essential safety measures that every roofer should follow before beginning any roofing task.
Conduct a Thorough Risk Assessment
- Uneven surfaces
- Weak or damaged roof structures
- Weather conditions (rain, wind, or extreme heat)
- Nearby electrical wires
By understanding these risks, you can implement preventative measures to mitigate accidents.
Wear Appropriate Personal Protective Equipment (PPE)
- Hard hats: Protects against head injuries from falling objects.
- Non-slip boots: Offers stability, especially on steep or slippery surfaces.
- Safety glasses/goggles: Shields eyes from debris.
- Gloves: Prevents cuts and abrasions while handling tools and materials.
- Harnesses and lanyards: Secures workers when working at heights.
Properly inspect all PPE for wear and tear before use to ensure maximum protection.
Use Stable Ladders and Scaffolding
- Always place ladders on a stable, level surface.
- Ensure the ladder extends at least three feet above the roof’s edge.
- Use ladders rated for your weight combined with tools.
- Secure the ladder at the top to prevent movement.
If scaffolding is used, check for proper assembly, load capacity compliance, and guardrails where required.
Verify Structural Integrity of the Roof
| Signs of Weakness | What to Look For |
| Sagging areas | Uneven or drooping sections |
| Water damage | Rotting wood or wet spots |
| Cracked shingles or tiles | Potential indicators of decay |
If any structural issues are identified, address them before proceeding with other tasks.
Maintain Weather Awareness
Weather plays a significant role in roofing safety. Avoid working during adverse conditions like heavy rain, high winds, snow, or extreme heat. Even light moisture can make roofs dangerously slick. Check forecasts regularly and schedule work during favorable weather to reduce risks.
Keep Tools Organized and Secure
- Use tool belts or tool organizers to keep essentials within reach.
- Avoid leaving tools unattended near roof edges.
- Secure larger equipment to prevent accidental falls.
Additionally, inspect power tools for defects before use to avoid malfunctions during operation.
Establish Clear Communication Protocols
- Use hand signals if verbal communication is difficult due to distance or noise levels.
- Confirm everyone understands emergency plans in case of an accident.
Two-way radios can also be useful when working on larger job sites where visual contact isn’t possible.
Following these critical safety measures ensures that every roofing project starts — and ends — with minimal risk while maintaining high standards of professional practice. By prioritizing preparation and precautionary steps upfront, roofers can mitigate hazards effectively while focusing on quality workmanship.
- Key Benefits of Hiring a Minneapolis Roofer for Your Home
- Step-by-Step Guide to Minneapolis MN Roof Replacement and Shingle Installation
- 10 Steps to Successfully Hire a Minneapolis MN Roofing Contractor
- Maximize Benefits by Choosing a Minneapolis MN Roofing Contractor for Your Roof Replacement
- 9 Essential Factors to Consider When Choosing the Right Minneapolis Roofer
- Step-by-Step Guide for Homeowners from a Minneapolis MN Roofing Contractor
- Key Signs You Need a Minneapolis MN Roof Replacement and When to Take Action
- Step-by-Step Guide to Choosing a Minneapolis MN Roofing Contractor for Your Home
- Tips for Minneapolis MN Roof Repair and Inspecting Storm Damage from the Ground